


To clean a slicker brush, lift the packed hair out of the pins with a comb or your fingers, wash the pad in warm water with a drop of mild shampoo, rinse it well, then stand the brush pins-down on a towel until it is completely dry. The whole job takes about five minutes and it is the single cheapest way to make a brush work better.
Most people never do it. A slicker brush quietly fills with a felted layer of hair, dander and dried skin oil between the pins and the pad, and once that layer is there the pins can no longer reach into the coat. The brush starts skimming the surface, and the owner concludes it has gone soft when it is simply clogged.
A clean brush also matters for skin. Old hair holds moisture and oil, and a pad that never dries out is not something you want dragged across a dog who already scratches.
If you want the background on what the pins are doing when they are clean, it is worth reading What a Slicker Brush Actually Does to a Coat alongside this guide.
Why a Clean Slicker Brush Works Better on Your Dog's Coat
A slicker brush works because of the gap between the pins. Each fine bent pin has room around it to catch a few loose hairs and release them, and the pad underneath has enough give to let the pins flex rather than scrape. Fill that gap with felted hair and both things stop happening.
The change is gradual, which is why it goes unnoticed. You slowly start needing more strokes for the same result, then more pressure, and more pressure on a coat is where skin problems begin. Here is what a clogged pad actually costs you:
- Shorter working pins. If 8 mm of packed hair sits on the pad, the pins are 8 mm shorter than they were. On a double coat that can be the difference between reaching the undercoat and not.
- Less flex. The pad is what lets the pins give way over a bony shoulder or a rib. A matted layer stiffens it, and a stiff pad transmits your pressure straight into the skin.
- No release. A full brush cannot take on more hair, so loose coat gets pushed along the surface and rolled rather than lifted out.
- Dirt going back in. Whatever was in the coat last month is still in the pad, going back onto a freshly bathed dog.
There is a safety angle too. When a brush stops working, the instinct is to press harder and go over the same patch again, and that is how a dog ends up sore.
How Hair, Dander and Shampoo Residue Build Up in a Slicker Pad
Three things collect in a slicker brush. Loose coat is the obvious one. It comes off in clumps at first, then the last thin layer works its way down to the pad and packs flat. That bottom layer is what almost everyone leaves behind, because from above the brush looks empty.
Dander and skin oil are the part you cannot see. Every session transfers a film of sebum onto the pins and dander sticks to it. Over a few months that film turns the hair at the base into a felted mat that fingers will not lift.
Product residue catches people out. Brush a dog while the coat is still damp from a conditioning rinse or a detangling spray and some of that product dries into the pins. It is sticky, and it accelerates everything else.
How fast a brush fills depends mostly on the dog:
- Heavy shedding double coats such as Huskies and Golden Retrievers fill a brush in one session during a coat blow. Clear it as you go.
- Curly and wool coats such as Poodles and Doodles shed less into the air but leave fine hair packed deep at the pad, which felts faster than anything.
- Silky feathered coats such as Spaniels and Setters leave long hairs that wind around several pins at once and need lifting rather than pulling.
Technique matters too. A brush dragged through a coat rather than worked in short passes fills faster and unevenly. How to Use a Slicker Brush Without Scratching Skin covers the stroke itself, which is worth getting right first.
What You Need to Clean a Slicker Brush at Home
Nothing here is specialist, and you almost certainly own all of it.
- A metal comb. The most useful tool for the job. Slide the teeth under the packed hair at pad level and lift the whole layer out in one piece.
- Warm water. Not hot. Heat softens the adhesive holding the pad and can warp a plastic backing.
- A drop of mild pet shampoo. One drop, not a squeeze. The job is to cut the skin oil, not to make foam.
- An old toothbrush. For scrubbing between the pins where a cloth cannot get.
- A towel. For standing the brush pins-down while it dries.
- Blunt scissors, occasionally. Only for long hairs wound tightly around a pin, and only cutting away from the pad.
Keep it away from bleach, boiling water, dishwashers, washing machines and solvent based cleaners. All of them attack the pad, the adhesive or the pins, and none clean better than warm water.
Recommended Tools for Coat Care Between Brush Cleanings
Cleaning a brush is easier when the brush is well made and the coat going into it is clean. These are the three tools the routine is built around.

Flying Pawfect Curved Slicker Brush
How easy a brush is to clean is decided before you buy it. A pad that is bonded evenly into the head, pins that are set straight and a handle that can be held under a tap without worrying about it are what turn brush cleaning from a chore into a five minute job.
The Flying Pawfect Curved Slicker Brush uses fine bent stainless steel pins set densely into a flexible cushioned pad. Stainless matters here more than people expect. Cheaper brushes use plated pins, and the moment that plating chips, the exposed metal underneath starts to corrode where it meets damp hair. A corroded pin snags coat, and once one pin snags the dog stops enjoying being brushed.
The curved head suits long, wavy and wool coats, because the shape follows the round of a shoulder or a thigh instead of fighting it. It also tends to collect hair evenly across the pad, so the packed layer lifts out in one piece rather than in awkward patches.
The pins are bent rather than straight, which is the detail that makes a slicker a slicker. A bent pin picks up loose hair on the working stroke and lets go of it on the lift, so the brush keeps taking on coat for longer before it fills. It also means that when you come to clean it, a comb slid under the hair at pad level pops the whole layer up in one go.
A flexible pad is what keeps pressure off skin. It gives way over the bones the pins would otherwise run straight into, and keeping that pad clean is what keeps it flexible. The handle is shaped so it can be held loosely, which matters more than it sounds, because you cannot apply hard pressure through a relaxed hand.
- Best for: Long, wavy, curly and wool coats
- Why it works: Fine bent stainless steel pins in a flexible cushioned pad, so hair lifts out cleanly instead of felting in
- Context: Rinses clean under a tap and dries fast when stood pins-down on a towel

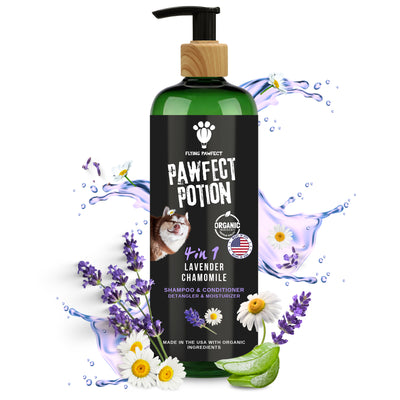
Flying Pawfect Pawfect Potion 4-in-1 Shampoo
The condition of the coat decides how quickly the brush clogs. A coat carrying weeks of dust and oil transfers all of it into the pad within a couple of sessions, and that oily film is what turns loose hair into a felted layer.
Pawfect Potion cleans, conditions, detangles and moisturises in one step, which is the point of a 4-in-1. It is pH balanced, uses plant-derived cleansers, contains organic ingredients, and is free of dyes, SLS, parabens, phthalates and alcohol. It is made in the USA and is suitable for all animals.
One practical note that belongs in a brush cleaning guide: a drop of this in warm water is exactly what you want for washing the pad itself. It cuts the skin oil without leaving the residue that dish soap or a degreaser would, and there is nothing in it you would mind touching your dog the next day.
- Best for: Any coat, before a full grooming session
- Why it works: Cleans, conditions, detangles and moisturises in one step, so there is less to transfer into the brush
- Context: A single drop in warm water is also the right thing to wash the brush pad with

Flying Pawfect Long Tooth Comb
The comb is the tool that actually cleans the brush, which is not why most people buy it but is a genuine reason to own one.
Slide the long teeth under the packed hair at the level of the pad, parallel to the pins, and lift. The whole layer comes away in a single sheet, including the compressed part at the base that fingers cannot get hold of. Doing it with your fingers works on the top layer only, and the top layer is not the problem.
On the dog, the comb tells you the truth. A slicker can leave a coat looking finished while loose undercoat is still sitting underneath it. Run the comb through afterwards and it either passes freely or it stops, and where it stops is where the work still is.
It is also the right tool for a small mat. Hold the hair at the base so the skin is not pulled, then tease the edge apart with the end teeth. Never force a comb through a mat, and if it does not come apart within a minute or two, that one is a job for a groomer.
- Best for: Lifting packed hair out of a slicker pad, and checking a coat after brushing
- Why it works: Long dual density steel teeth reach the base of the pins and the base of the coat
- Context: Keep it next to the brush, because the two tools are used together every time
Step by Step: Cleaning a Slicker Brush in Five Minutes
Do this once a month for an average dog, and after every session in shedding season.
- 1. Lift the bulk out. Slide a comb under the hair at pad level, parallel to the pins, and lift the layer away in one sheet. Work from one edge to the other rather than digging at the middle.
- 2. Deal with the wound hairs. Long hairs sometimes wrap several times around one pin. Unwind them if you can, or snip them with blunt scissors, cutting away from the pad.
- 3. Make the wash water. A bowl of warm water with one drop of mild pet shampoo. Warm, not hot.
- 4. Dip and scrub. Dip the pins in, then work an old toothbrush between the rows in both directions. You are scrubbing the pad surface, not the pins.
- 5. Rinse properly. Under a running tap until the water comes off clear. Residue left in a pad attracts dirt faster than a clean one.
- 6. Shake and blot. Shake the water out, then press the pins gently into a towel.
- 7. Dry pins-down. Stand the brush with the pins resting on a dry towel so water drains away from the pad rather than sitting in it. Leave it overnight. Do not use a hairdryer and do not put it on a radiator.
- 8. Check before it goes away. Run a hand across the pins. Any that are bent flat or splayed tell you the brush is near the end of its life.
Between full cleans, a ten second clear-out with the comb at the end of every session keeps the pad from ever felting in the first place.
Prevention Tips That Keep a Slicker Brush Cleaner for Longer
- Clear it during the session, not after. When the pins stop picking up hair, that is the moment to clear them, not ten minutes later.
- Only brush a fully dry coat. Damp coat plus product is what turns loose hair into felt inside the pad.
- Use lighter strokes. Short passes with a relaxed hand fill a brush more slowly than long heavy drags, and they are better for the dog.
- Store it pins-up or hanging. A brush left pins-down in a drawer collects everything else in the drawer.
- Keep one brush per animal in a multi-pet home. It is better hygiene and each brush fills at half the rate.
- Never put it away damp. A pad that stays wet is the one thing that shortens a good brush's life quickly.
Even with all of that, no brush lasts forever. How Often to Replace Your Dog Brush sets out the signs that cleaning is no longer the answer.
Common Mistakes When Cleaning a Slicker Brush
These either do not work or shorten the brush's life.
- Only pulling the top layer off. The visible clump comes away easily and the felted layer underneath stays put. This is the most common mistake by a distance.
- Using hot water. Heat can soften the adhesive holding the pad and can distort a plastic head.
- Putting it in the dishwasher. Heat, harsh detergent and a hot dry cycle at once. It comes out looking clean and quietly damaged.
- Bleach or disinfectant wipes. Residue sits in the pad and then goes onto skin. If there is a genuine hygiene reason to disinfect, ask your vet what is safe.
- Leaving it to dry pins-up, or drying it with heat. Pins-up means water runs down into the pad and sits there. A hairdryer or a radiator warps pads and loosens pins. Air drying pins-down overnight costs you nothing.
- Cutting towards the pad. One slip and you have a cut in the cushion that will keep catching hair from then on.
One more worth saying plainly. If your dog has flaky skin, a persistent smell, redness or bald patches, a clean brush is not the fix. Those are reasons to see a vet.
FAQs
How often should you clean a slicker brush?
Clear the loose hair out after every session, and wash the pad properly about once a month for an average dog. During a heavy shed, or if you groom several animals with the same brush, wash it weekly. If the pins look shorter than they used to, it is already overdue.
Can you wash a slicker brush with water?
Yes, warm water with a single drop of mild pet shampoo is the standard method. The important part is drying it pins-down on a towel afterwards so water drains away from the pad rather than soaking into it. Never use hot water, and never put it in a dishwasher or washing machine.
What is the fastest way to get hair out of a slicker brush?
Slide a metal comb under the hair at the level of the pad, parallel to the pins, and lift. The packed layer comes away in one sheet. Pulling at it with your fingers only removes the loose top layer and leaves the felted base behind.
Why does my slicker brush stop picking up hair?
Almost always because the pad is full. A packed layer of hair at the base shortens the working length of the pins and stops them flexing, so they skim the coat instead of reaching into it. Clean it properly and most brushes work like new again.
Can you use soap or dish detergent on a dog brush?
A drop of mild pet shampoo is better. Dish detergent is designed to strip grease aggressively and tends to leave a residue in the pad that then transfers onto skin. Avoid bleach, solvents and disinfectant wipes entirely unless your vet has told you otherwise.
How long does a slicker brush take to dry?
Leave it overnight, standing pins-down on a dry towel. That is usually enough for the pad to dry through. Do not speed it up with a hairdryer or a radiator, because heat is what loosens pins and warps the cushion.
Should each pet have its own brush?
In a multi-pet home it is worth it. It is better hygiene if one animal has a skin problem, each brush fills up at half the rate, and you can match the brush size and shape to each coat rather than compromising. It also means you are never cleaning a brush at the moment you want to use it.
When should I replace a slicker brush instead of cleaning it?
When pins are bent flat, splayed apart or missing, when the pad has come away from the head at any edge, or when the cushion no longer springs back after you press it. At that point the brush is no longer doing the thing that makes it safe on skin, and cleaning will not bring it back.
Final Thoughts
Cleaning a slicker brush is the highest return five minutes in the whole grooming routine. It costs nothing, needs no special equipment, and it brings a brush that felt worn out back close to how it was on day one.
The method is simple enough to remember without a list: comb the packed hair out at pad level, wash the pad in warm water with a drop of shampoo, rinse it clear, and dry it pins-down overnight. Do that once a month, clear the loose hair out at the end of every session, and a good brush will keep working properly for years. If the coat is still fighting you with a clean brush, the answer is usually technique rather than the tool.
![[CL] Flying Pawfect coral large flat slicker brush for dogs](http://flyingpawfect.com/cdn/shop/files/CoralLarge2026.jpg?v=1783693245&width=400)
![[BL] Flying Pawfect baby blue large curved slicker brush for doodles and long haired dogs](http://flyingpawfect.com/cdn/shop/files/CBL_HERO_26_05_819be2a4-36dd-43dc-bda3-1730fa9e5818.jpg?v=1784475444&width=400)