


A slicker brush and a pin brush are not rivals, they are two different jobs. A slicker brush has short, fine, bent steel pins set close together, and it reaches down through the coat to lift out loose undercoat and open small tangles. A pin brush has widely spaced pins with rounded tips, and it smooths and separates the top coat. Most dogs need one of them far more than the other.
The confusion is understandable, because the two tools look vaguely similar in a photograph. Side by side in your hand they are nothing alike. One is a dense pad of hundreds of fine wires. The other is a scattering of maybe fifty thicker pins on a cushion, closer to a human hairbrush than to a grooming tool.
Buy the wrong one and the result is not obvious for weeks. The coat looks brushed. It feels brushed on the surface. Then the groomer parts the hair behind the ears and finds a solid sheet of packed undercoat that a pin brush was never going to touch.
If you are standing in a shop or scrolling a product page trying to decide, this guide should settle it in about five minutes. Start with Flat vs Curved Slicker Brush (Which One is Better?) if you have already decided on a slicker and are choosing between the two shapes.
Why the Slicker Brush and Pin Brush Do Genuinely Different Jobs
The difference is not quality or price. It is pin density, pin diameter and pin angle, and those three things decide what part of the coat the tool can actually reach.
A slicker brush carries hundreds of very fine pins per square inch, bent near the tip. That bend is the whole trick. As you draw the brush through the coat the angled tips slide past the guard hairs and hook the loose, dead undercoat that is sitting trapped underneath, then carry it out. The density means each pass collects a lot of it.
A pin brush has perhaps forty to eighty straight pins, often with a plastic or polished ball on each tip, mounted on a rubber cushion. Those pins are thick enough that they cannot penetrate a dense coat without pushing it aside. What a pin brush does well is glide over a long, silky top coat, lay it flat, separate the strands and spread the natural oils along the hair shaft.
So the honest summary is this. A slicker brush removes. A pin brush finishes. If your dog is shedding, matting, or carrying an undercoat of any kind, removal is the job that needs doing.
- Slicker brush: fine bent steel pins, densely set, reaches the undercoat and opens tangles
- Pin brush: thick widely spaced pins, smooths and separates the surface of a long coat
- The test: after brushing, part the coat down to the skin. A slicker leaves clean skin, a pin brush usually leaves packed fluff
How a Pin Brush Skims the Surface While a Slicker Reaches the Undercoat
Picture the coat in two layers, because most dogs have exactly that. The guard hairs on top are longer, coarser and weather resistant. Underneath sits the undercoat, a soft dense layer that insulates and that the dog sheds in quantity, usually twice a year and often more in a centrally heated house.
The undercoat is what mats. It comes loose from the follicle but it does not fall out cleanly, because the guard hairs hold it in place like a net. It sits there, collects moisture and friction, and slowly felts into a mat, starting in the places where the dog moves most: behind the ears, under the collar, in the armpits, on the backs of the thighs.
A pin brush travels across the top of that net. It cannot get underneath it, because its pins are too thick and too far apart to slip between hairs. You see a satisfying sheen and a small amount of hair on the pins, and you reasonably conclude the job is done.
A slicker brush gets underneath because the pins are fine enough to pass between individual hairs and bent so the tips travel at a shallow angle rather than stabbing straight down. The loose undercoat catches on the bends and comes away in soft grey wads. The volume of hair it pulls out the first time surprises most owners.
This is also why a pin brush is not a lesser slicker. On a silky single coat with no undercoat at all, an Afghan Hound or a well groomed Yorkshire Terrier in full length, a pin brush is genuinely the more appropriate finishing tool and a slicker used carelessly can scuff the hair.
What a Two Brush Routine Looks Like on a Real Coat
Plenty of owners end up owning both, and they are right to. The order matters more than people expect.
The removal work comes first, always. Take the slicker brush through the coat in sections, working from the skin outwards, and keep going until the brush stops filling up. Only then, if the coat is long enough to benefit, does a pin brush earn its turn, laying everything flat and putting the shine back.
Doing it the other way round wastes both tools. A pin brush dragged over an unbrushed coat pushes loose undercoat further down and can tighten a tangle you have not noticed yet.
How often depends entirely on the coat. A short double coated dog can be fine with two slicker sessions a week outside of shedding season. A long coated breed that mats easily wants something short every day, which is far less work than an hour of dematting every fortnight. How to Choose the Right Brush for Your Dog’s Coat walks through the main coat types if you are not sure which one you have.
- Step one: slicker brush, in sections, for removal
- Step two: a comb through to check nothing was left behind
- Step three: pin brush over the top, only on a long coat, for finish
Recommended Tools for Choosing Between a Slicker and a Pin Brush
If you are only buying one tool, buy the one that does the work that matters. For the overwhelming majority of dogs, that is the slicker.

Flying Pawfect Slicker Brush
This is the large flat slicker, and it is the shape to reach for when the coat is dense and the surface area is big. The head measures 8.5 by 4 inches, the pins stand 25 mm proud of the pad, and the whole brush weighs 121.6 grams, which is light enough that your wrist does not do the pressing.
That pin length is the part worth understanding. Twenty five millimetres is long for a slicker, and it is what lets the tips pass through a guard coat and reach the undercoat underneath rather than raking across the top of it. A short pinned slicker on a thick coat has exactly the same problem as a pin brush.
The pins are fine bent stainless steel, densely set across the pad. Fine matters because thickness is what stops a pin slipping between hairs. Bent matters because a straight pin drives down into the skin instead of travelling along it, and that is what makes a badly designed slicker uncomfortable.
The flat head suits double coats, short coats and general finishing, where you want maximum contact with a flat plane of coat. For curly and long coats that need the brush to follow the curve of a leg or a chest, the curved version is the better shape. The flat brush shown here is the one to start with if your dog sheds.
Technique does more than pressure. Hold the brush lightly, let the weight of the head do the work, and take short strokes in the direction the coat grows. If you are leaning on it, the pins are already at the skin and you are brushing the dog, not the coat.
- Best for: shedding coats, double coats and any dog that mats under the surface
- Why it works: fine bent pins pass between guard hairs and lift the loose undercoat out
- Context: the removal tool, used before any finishing brush, never after

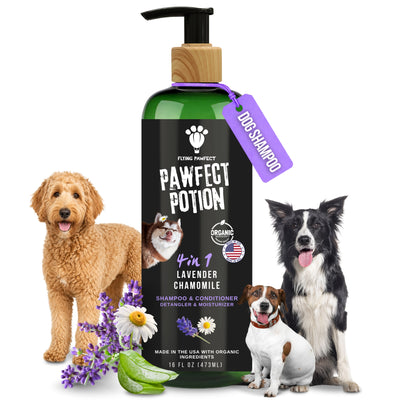
Flying Pawfect Pawfect Potion 4-in-1 Shampoo
Brushing gets easier when the coat is clean and conditioned, and that is the honest case for a shampoo in an article about brushes. Friction is what makes brushing uncomfortable, and a coat carrying dust and dried mud has a lot of it.
The Pawfect Potion cleans, conditions, detangles and moisturises in one step, which is the four in one. It is pH balanced, built on plant derived cleansers, contains organic ingredients and is made in the USA, with no dyes, SLS, parabens, phthalates or alcohol.
Used as part of a bath routine it reduces brushing friction noticeably, so the slicker travels through the coat rather than snagging at it. On a long coat that difference is the difference between a calm ten minutes and a dog who decides brushing is unpleasant.
It is suitable for all animals, not only dogs, so one bottle covers a mixed household. What it does not do is replace brushing. No shampoo lifts dead undercoat out of a coat, and none of them prevent mats on their own.
The order that works is brush first, wash second, dry thoroughly, then brush again as the coat dries. Washing a matted coat sets the mat harder, because water swells the hair and then dries it tighter.
- Best for: any coat that feels dry, dusty or hard to draw a brush through
- Why it works: conditions and detangles in the same step, reducing friction under the brush
- Context: supports a brushing routine, never a substitute for one

Flying Pawfect Long Tooth Comb
The comb is what tells you the truth. A slicker brush can leave a coat looking finished while a layer of packed undercoat is still sitting against the skin, and the only reliable way to find out is to try to pass a comb through to the skin and see whether it stops.
This one has long dual density steel teeth on a beech handle, wide spacing at one end and closer spacing at the other. The wide end goes through first to find resistance, the close end follows to catch what the brush missed.
If the comb stops, the brushing is not finished. Go back to the slicker on that area rather than forcing the comb, because forcing a comb through a mat pulls the skin and teaches a dog to dread the whole routine.
It also does the fine work a brush of any kind is too blunt for: the hair behind the ears, the fringe on the front legs, the sensitive area at the base of the tail.
Most owners who start comb checking find mats they had no idea existed, in exactly the places Dog Comb vs Slicker Brush | Why Long Coats Need Both describes.
- Best for: checking your brushing rather than replacing it
- Why it works: two tooth spacings on one comb, wide to find resistance and close to finish
- Context: used after the slicker, before any finishing brush
Step by Step: Testing Whether Your Pin Brush Is Doing Enough
You do not have to guess which tool your dog needs. This takes about three minutes and gives you a straight answer.
- 1. Brush as you normally do. Use whatever tool you currently own, on the shoulder and the flank, until you would normally stop.
- 2. Pick a high risk spot. Behind an ear, under the collar line, or the back of a thigh. These felt first on almost every dog.
- 3. Part the coat down to the skin. Use your fingers and push the hair apart rather than lifting it. You want to see skin.
- 4. Look at what is between the skin and the surface. Clear hair that falls back into place is a good result. A grey or cream layer that stays compressed is undercoat your brush is not reaching.
- 5. Run a comb from the skin outwards. If it travels the whole way, you are finished. If it snags an inch in, you have found a mat forming.
- 6. Repeat in three places. One clear spot proves nothing. Coats mat unevenly.
If the comb stops in two out of three places, the tool is the problem rather than your effort, and a slicker is what is missing.
Prevention Tips for Coats That Look Brushed but Are Matting Underneath
A surface brushed coat is the most common way a dog ends up shaved at the groomer, because the owner genuinely believed the coat was being maintained.
- Brush in sections, not in sweeps. Work a hand sized area until it is clear before moving on.
- Start at the skin. Lift a line of hair with one hand and brush the layer underneath it outwards. Then drop the next line down.
- Do the hidden places first. Armpits, groin, behind the ears and the tail base, while the dog is still fresh and patient.
- Dry properly. A damp coat left to air dry under a collar is where a lot of mats begin.
- Short and often beats long and rare. Five minutes daily prevents the hour long session nobody enjoys.
- Keep the brush clean. A slicker packed with old hair stops collecting new hair.
If the coat changes suddenly, if hair comes out in patches, or if the skin underneath looks red, sore or flaky, that is a conversation with a vet rather than a brushing problem.
Common Mistakes When Swapping Between a Slicker and a Pin Brush
Most of these come from treating the two tools as interchangeable, which they are not.
- Using a pin brush on a shedding double coat. It moves loose hair around rather than removing it.
- Finishing first. A pin brush before a slicker presses loose undercoat back down into the coat.
- Pressing harder to compensate. Pressure does not make a pin brush reach further, it just scrapes the skin.
- Buying a slicker with short pins for a thick coat. Pin length decides depth, and a short pin cannot reach an undercoat.
- Skipping the comb check. Without it you are judging your brushing by how the surface looks.
- Working over the same spot repeatedly. Slicker burn comes from repetition on one patch, not from the tool itself.
- Brushing a completely dry, dusty coat. Friction makes it uncomfortable and breaks hair. A light mist of water or a wash first helps.
FAQs
Is a slicker brush or a pin brush better for shedding?
A slicker brush, without much argument. Shedding is loose undercoat that needs lifting out from under the guard hairs, and only the fine bent pins of a slicker can get down there. A pin brush will collect a little surface hair but leaves the bulk of it in the coat.
Can a pin brush replace a slicker brush?
Not on a coat that has an undercoat or that mats. It can replace a slicker on a long silky single coat with no dense underlayer, where its job is smoothing rather than removal. For most household dogs the slicker is the tool that cannot be skipped.
Does a slicker brush hurt a dog?
Not when it is used correctly. Discomfort comes from pressing down, from working the same small patch over and over, or from a brush with straight rather than bent pins. Let the weight of the head do the work and keep moving to a new section.
Which brush should I use on a Goldendoodle or a Poodle?
A slicker, and a curved one suits the shape of a curly coat best. Curly coats trap shed hair rather than dropping it, so it accumulates against the skin and felts. A pin brush cannot get into that at all.
Do I need both a slicker brush and a pin brush?
Only if the coat is long enough for the finish to matter. Long silky breeds benefit from a pin brush after the slicker. Short coats, double coats and most curly coats need the slicker and a comb, and nothing else.
What about a comb, where does that fit?
The comb is your check, not another brush. After the slicker, a comb taken from the skin outwards tells you whether the area is genuinely clear. If it snags, go back to the slicker on that spot.
How do I clean a slicker brush?
Lift the collected hair out of the pins with your fingers or a comb after every session, and wash the head occasionally in warm water with a little shampoo, then let it dry completely before use. A loaded brush stops picking up hair.
My dog hates being brushed, does the tool matter?
It often does. Many dogs that resist brushing have been brushed with a tool that scrapes rather than one that lifts, or have a mat somewhere that hurts when it is pulled. Short, calm sessions with the right brush usually change the picture within a fortnight.
Final Thoughts
The short version is that a slicker brush and a pin brush are not competing for the same job. A slicker removes loose undercoat and opens tangles. A pin brush lays a long top coat flat and puts a shine on it. If your dog sheds or mats, the slicker is the tool that does the work.
Own both if the coat is long and silky enough to earn a finish, and always use them in that order. Brush with the slicker, check with a comb, then finish with the pin brush if it still adds anything.
And if the comb stops an inch above the skin, that is the coat telling you something useful. Better to hear it now than from a groomer holding a pair of clippers.
![[CL] Flying Pawfect coral large flat slicker brush for dogs](http://flyingpawfect.com/cdn/shop/files/CoralLarge2026.jpg?v=1783693245&width=400)
![[BL] Flying Pawfect baby blue large curved slicker brush for doodles and long haired dogs](http://flyingpawfect.com/cdn/shop/files/CBL_HERO_26_05_819be2a4-36dd-43dc-bda3-1730fa9e5818.jpg?v=1784475444&width=400)