


If your dog gets mats after wearing a harness, you are not imagining it. Harnesses are useful for walks, training, travel, and safety, but they also press against the exact coat areas where tangles form fastest.
Harness mats usually appear around the chest, shoulders, underarms, neck, behind the elbows, belly strap area, and sometimes along the back where the straps sit. These spots rub every time your dog walks, runs, pulls, sits, lies down, or moves their front legs.
The frustrating part is that harness mats often start hidden. The coat may look fine from the outside, but underneath the straps, loose hair can become flattened, twisted, warm, damp, and compressed.
Once that compressed coat is left alone for several walks, small tangles can turn into tight mats close to the skin. This is especially common in curly, wavy, long, fluffy, soft, and double-coated dogs.
For a focused prevention routine, read How to Prevent Harness Mats in Dogs. This article goes deeper into why harness mats happen in the first place and how to stop them with a simple post-walk routine.
For easier home coat care, start with a brush that helps you work in small sections instead of forcing through tangles. The Flying Pawfect Slicker Brush helps loosen compressed coat around harness zones before small knots become harder to manage.
Why Harness Mats Matter
Harness mats matter because they form in areas that move constantly. A mat under the front leg or across the chest can pull every time your dog takes a step, stretches, jumps, or lies down.
They can also make your dog dislike the harness. If the coat is already tangled, putting the harness on top of those tangles can add pressure and discomfort.
- Harness mats can pull on the skin during normal movement.
- They often hide under the straps, so owners may not notice them early.
- They can make brushing harder because the coat becomes flattened and packed.
- They can become worse after wet walks, rain, swimming, or damp grass.
- They are easier to prevent with a short routine than to remove once tight.
The biggest mistake is treating harness mats like random knots. They are usually caused by a repeat pattern: pressure, friction, moisture, trapped loose hair, and missed brushing.
Once you understand that pattern, prevention becomes much easier. You do not need to brush your whole dog every time they wear a harness. You need to check the exact areas where the harness touches and rubs.
How Harness Mats Happen
Harness mats happen because the coat is being compressed while the dog moves. The straps press the hair down, then movement causes the coat to rub back and forth under that pressure.
Loose hair makes the problem worse. If loose coat is already sitting in the chest, shoulder, or underarm area, the harness can trap it against the body and twist it into nearby hair.
- Chest straps: These can flatten coat across the front of the body and create tangles where the harness rests.
- Shoulder straps: These move with each step and can rub longer coat around the shoulder blades.
- Underarm areas: These are high-friction zones because the front legs move constantly against the body.
- Neck and collar line: Harnesses that sit high can compress the coat near the base of the neck.
- Belly strap area: This area can hold moisture, dirt, and flattened coat after walks.
- Back strap area: Some harnesses rub along the spine or shoulder area if they shift during movement.
- Wet coat: Damp fur under a harness can clump faster and tighten as it dries.
Harness fit also matters. A harness that slides around too much can rub repeatedly in one area. A harness that is too tight can press the coat into a flat, packed shape.
Coat type matters too. Dogs with curly, wavy, long, fluffy, fine, cottony, or dense coats are more likely to mat under harnesses because their loose hair does not always fall away easily.
What the Solution Involves
Solving harness mats is not about avoiding harnesses completely. A harness can be the right choice for many dogs. The solution is to manage the coat before and after the harness creates friction.
The best system is simple: brush before longer outings, remove the harness when it is not needed, feel the strap areas after walks, use a slicker brush to loosen compressed coat, and comb-check any section that feels dense.
- Brush the harness zones before long walks, hikes, training sessions, or car rides.
- Make sure the coat is dry before putting on the harness whenever possible.
- Use a harness that fits securely without sliding, pinching, or digging into the coat.
- Remove the harness when your dog is not walking, training, or traveling.
- After use, feel the chest, shoulders, underarms, belly strap area, and neck area with your fingers.
- Use a slicker brush to restore lift and separation to compressed coat.
- Use a comb check if the coat feels thick, flattened, clumpy, or resistant.
For a broader mat-prevention routine beyond harness areas, read Mat Prevention Tips for Dogs | Complete Grooming Guide. Harness mats are one example of a larger rule: high-friction areas need more attention than easy, visible areas like the back.
The key is timing. A small knot after one walk can often be loosened quickly. A compressed mat after several days or weeks may be too uncomfortable to remove safely at home.
Recommended Tools

Flying Pawfect Slicker Brush
The Flying Pawfect Slicker Brush is the main tool for preventing harness mats because it helps separate compressed coat before small tangles become tight. This matters because harness mats usually do not begin on the surface. They begin underneath the strap area, close to where the coat is being pressed and rubbed.
A harness can flatten coat across the chest, shoulders, underarms, belly strap area, and neck. If that coat is not lifted and separated afterward, loose hair can stay trapped and begin wrapping into nearby strands.
The brush works best as part of a post-harness routine. After removing the harness, use your fingers to feel the strap areas first. Then brush those zones with short, controlled strokes instead of dragging through a large section.
The Flying Pawfect Slicker Brush also helps before the harness goes on. If your dog already has small tangles in the chest or underarm area, the harness can compress those tangles and make them worse during the walk.
This brush fits naturally into daily grooming because you do not need a full-body session every time. For harness wear, focus on the chest, shoulder straps, underarms, behind the elbows, belly strap area, neck, and any place where the harness rubs.
It helps prevent a common mistake: brushing the back because it is easy while ignoring the areas that actually mat. Harness mats are almost always found in friction zones, not in the smooth open areas owners usually brush first.
Tool quality matters because harness zones can be sensitive. A weak brush may skim over compressed hair, while a harsh brush may pull and make your dog resist grooming. A better brush helps you work accurately with lighter pressure.
The Flying Pawfect Slicker Brush should be used before a comb check. The brush loosens and separates the coat first. The comb then confirms whether the coat is clear or whether a hidden snag still needs attention.
Used consistently, it helps make harness mat prevention fast and realistic. A few focused minutes after walks can keep the coat softer, more comfortable, and easier to maintain between professional grooming appointments.
- Best for: Dogs that get mats from harnesses, chest straps, underarm friction, shoulder rubbing, neck compression, belly straps, and daily walks.
- Why it works: It helps lift and separate compressed coat before loose hair and friction turn small tangles into tight mats.
- Context: Use before long harness wear and after removing the harness, then follow with a comb check if the coat feels resistant.

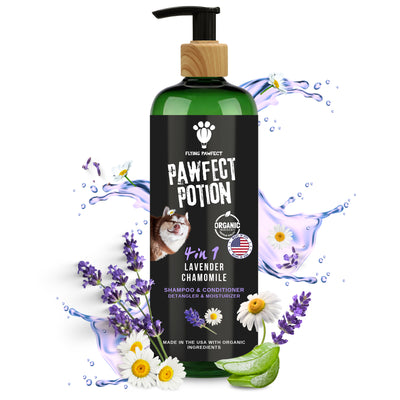
Flying Pawfect Pawfect Potion 4-in-1 Shampoo, Conditioner, Detangler & Moisturizer
Flying Pawfect Pawfect Potion is a 4-in-1 dog shampoo, conditioner, detangler, and moisturizer designed to support a cleaner, softer, easier-to-manage coat. It is useful for dogs that wear harnesses because dirt, sweat, moisture, and product buildup can make compressed coat harder to brush.
The Lavender Chamomile formula includes Aloe Vera and Coconut Oil, which are commonly used in gentle coat-care products to support softness and moisture. It also contains organic ingredients and plant-derived cleansers for owners who want a clean and gentle formula for regular dog bathing.
This shampoo fits into the harness mat routine after brushing, not before brushing. If your dog already has tangles under the chest straps, shoulder straps, or underarms, brush and comb-check those areas before the bath so water does not tighten hidden knots.
The conditioning and detangling support can help reduce brushing friction after a proper bath, especially when the coat has become dry, dusty, clumpy, or harder to separate. It should not be used as a replacement for brushing or as a way to force through tight mats.
For harness-wearing dogs, the biggest benefit is routine support. A clean, moisturized, properly dried coat is easier to maintain than a dirty, dry, or damp coat that keeps catching under straps.
After bathing, rinse thoroughly and dry the coat fully before the final brush-through. Damp coat under a harness can clump quickly, so never put a harness back on over wet or half-dry mat-prone hair unless there is a safety reason and you check the coat afterward.
- Best for: Dogs that need a gentle bath routine, softer coat feel, detangling support, moisture support, and easier post-bath brushing around harness zones.
- Why it works: The 4-in-1 formula helps clean, condition, detangle, and moisturize while supporting a soft, healthy-looking coat.
- Context: Brush before bathing, wash gently, rinse well, dry fully, then finish with a slicker brush and comb check before harness use.

Stainless Steel Dog Comb
A stainless steel dog comb is the checking tool for harness mat prevention. The slicker brush loosens compressed coat, but the comb tells you whether the area is truly clear.
This matters because harness mats can hide under flattened coat. The outside may look smooth after brushing, but the comb may still catch in the underarm, chest, shoulder, or belly strap area.
Use the comb after slicker brushing, not before. Starting with a comb on compressed coat can pull hard, especially if the hair is already twisted from harness friction.
If the comb catches, stop. Return to the slicker brush, work the area in smaller sections, and check again only when the coat feels looser.
The comb is not a force tool. It is a confirmation tool. When it glides through the harness zone, you know the coat is clear enough to move on.
- Best for: Checking chest straps, shoulders, underarms, belly strap areas, neck, behind elbows, and other harness friction zones.
- Why it works: It reveals hidden snags that may stay beneath compressed coat after brushing.
- Context: Use after slicker brushing as a check, not as the first tool on tangled or packed coat.
Step-by-Step Guide: How to Stop Harness Mats
A harness mat routine should be quick enough to repeat. You do not need to make every walk into a full grooming session. You need a reliable habit around the areas that rub.
This routine is especially important for dogs with long, fluffy, curly, wavy, fine, cottony, dense, or double coats. These coat types are more likely to trap loose hair when compressed.
- Check the coat before the harness goes on: Feel the chest, shoulders, underarms, neck, and belly strap area for clumps or resistance.
- Brush high-risk zones before long outings: Use the slicker brush to separate coat that will sit under straps.
- Put the harness on dry coat: Damp hair under pressure can clump and tighten faster.
- Check the fit: The harness should be secure without pinching, sliding, or rubbing repeatedly in one spot.
- Remove the harness after use: Do not leave it on all day unless there is a specific safety reason.
- Feel the strap areas after walks: Look for flattened, warm, damp, clumpy, or resistant coat.
- Brush with short strokes: Focus on the compressed areas instead of brushing randomly over the back.
- Comb-check when needed: If the coat feels dense or the brush catches, use the comb after brushing.
- Adjust the routine after wet walks: Dry the coat fully before it sits compressed again.
- Call a groomer for tight mats: Skin-close, painful, flat, or large mats should not be forced out at home.
The comb check is one of the easiest ways to stop guessing. For the full method, read The Comb Test Every Dog Owner Should Know.
Prevention Tips for Harness Mats
Harness mat prevention is mostly about timing and consistency. A few focused minutes after harness wear can prevent much bigger problems later.
The best routine depends on your dog’s coat type, harness style, activity level, and how often the harness is worn. Daily harness wear needs more frequent checking than occasional walks.
- Remove the harness when your dog is not actively walking, training, or traveling.
- Brush the chest, shoulders, underarms, neck, and belly strap area before long walks.
- Check the same areas again after walks, hikes, playdates, and car rides.
- Never put a harness over damp coat if you can avoid it, especially on mat-prone dogs.
- Dry harness zones fully after rain, baths, swimming, wet grass, or muddy walks.
- Use a harness that fits properly and does not slide from side to side.
- Keep coat shorter under the harness if your dog mats faster than you can maintain it.
- Use a slicker brush first, then a comb if the coat feels resistant.
If your dog wears sweaters, coats, life jackets, or recovery suits, use the same logic. Anything that presses and rubs against the coat can create similar matting patterns.
The goal is not to avoid all gear. The goal is to treat gear contact points as grooming priority zones.
Common Mistakes
Most harness mat mistakes happen because owners brush the easy visible coat and miss the strap zones. The back may look perfect while the chest, underarms, and belly strap area are forming knots.
A better routine follows the harness. Wherever the harness touches, presses, or moves, that area needs regular coat checks.
- Leaving the harness on all day: Constant compression increases friction and mat risk.
- Only brushing the back: Harness mats usually form on the chest, shoulders, underarms, neck, and belly strap area.
- Using a comb first: A comb can pull if compressed coat has not been loosened with a slicker brush.
- Ignoring wet coat: Damp fur under a harness can tighten and clump as it dries.
- Using a poor harness fit: A harness that slides, digs, or rubs can create repeated friction in the same spot.
- Waiting until mats are visible: By the time you see the mat, it may already be tight underneath.
- Bathing before brushing: Water can tighten hidden tangles under harness zones.
- Forcing through tight mats: Painful or skin-close mats should be handled by a professional groomer.
If your dog suddenly dislikes the harness, check the coat before assuming the harness itself is the only problem. A mat under the strap can make even a well-fitted harness feel uncomfortable.
FAQs
Why does my dog get mats after wearing a harness?
Your dog gets mats after wearing a harness because the straps press, rub, and flatten the coat while your dog moves. Loose hair, moisture, friction, and skipped brushing can turn that compressed coat into mats.
Where do harness mats form most often?
Harness mats usually form around the chest, shoulders, underarms, behind the elbows, neck, belly strap area, and sometimes along the back strap. These areas experience pressure and movement during walks.
Should I brush my dog before putting on a harness?
Yes, especially before long walks, hikes, training sessions, or car rides. Brushing first removes loose hair and small tangles before the harness compresses them.
Should I remove my dog’s harness after walks?
Yes, unless there is a specific safety reason to keep it on. Removing the harness reduces constant coat compression and gives you a chance to check the strap areas.
What brush helps prevent harness mats?
A quality slicker brush is usually the best main tool because it helps separate compressed coat in the harness zones. A stainless steel comb should be used afterward if the coat feels thick, clumpy, or resistant.
Can shampoo prevent harness mats?
Shampoo can support a cleaner, softer, easier-to-brush coat, but it does not replace brushing. Brush before bathing, rinse well, dry fully, and comb-check the harness areas before the harness goes back on.
Final Thoughts
Harness mats happen because straps create pressure and friction in areas where coat already mats easily. The chest, shoulders, underarms, neck, belly strap area, and behind the elbows need more attention than the back or sides.
The best prevention routine is simple: brush before longer harness wear, remove the harness when it is not needed, check the strap zones after walks, dry the coat after moisture exposure, and use a comb check when the coat feels resistant.
With the Flying Pawfect Slicker Brush, Flying Pawfect Pawfect Potion 4-in-1 Shampoo, and a simple comb-check routine, your dog’s harness areas can stay cleaner, softer, more comfortable, and easier to maintain between grooming appointments.
![[CL] Flying Pawfect coral large flat slicker brush for dogs](http://flyingpawfect.com/cdn/shop/files/CoralLarge2026.jpg?v=1783693245&width=400)
![[BL] Flying Pawfect baby blue large curved slicker brush for doodles and long haired dogs](http://flyingpawfect.com/cdn/shop/files/CBL_HERO_26_05_819be2a4-36dd-43dc-bda3-1730fa9e5818.jpg?v=1784475444&width=400)