


Hold a slicker brush like a pen, not like a hammer. Your thumb runs along the top of the handle, your fingers sit underneath, and the head is tilted so only the leading edge of the pins meets the coat. Gripping it in a fist and pressing the whole pin field flat is what scratches skin.
Nobody is ever taught this. A slicker brush arrives in a box and the handle is shaped like a hairbrush handle, so people hold it the way they hold a hairbrush and push it through the coat.
That one habit causes most of the problems owners blame on the brush itself: red skin, a dog who flinches, a coat that looks flattened rather than lifted, and an aching wrist by the second leg.
So here is the grip, why it works, and the four changes that make the most difference. None of it needs a new brush.
Why Your Grip on a Slicker Brush Decides Whether It Hurts
A slicker brush has a dense field of fine bent pins. On the large flat brush those pins stand 25 mm proud of the pad, which is long. That length is the whole point, because it is how the pins reach past the top coat into the layer where loose hair and tangles actually live.
But 25 mm of fine steel is also 25 mm of potential pressure on skin. Whether it reaches the coat or the skin is decided entirely by the angle you hold it at.
Held flat, every pin in the field arrives at the same instant and the tips land together. Tilted, the leading row enters first, parts the coat, and the rows behind it follow into a path that is already open. Same brush, completely different experience for the dog.
- Angle decides depth: a tilted head slides in, a flat head stamps down
- Grip decides pressure: a fist can push, a pen grip physically cannot push very hard
- The wrist decides the stroke: wrist flicks are short and sharp, arm movements are long and even
- The free hand decides tension: coat held taut hurts, coat held slack does not
- Nothing here is about the brush: the same tool is gentle or harsh depending on the hand
If you are still choosing between brush types, The Complete Grooming Toolkit for Dogs and Cats covers which tool does which job. This article assumes you already have a slicker and want to use it properly.
How a Flat-On Grip Scratches Skin and Flattens Coat
Picture the head pressed flat against a dog’s side. The pad is rigid, the dog is not flat, so the pins in the middle sit against coat while the pins at the corners are driven into the skin at the edges of the pad.
That is where brush burn comes from. It is not the pins being sharp. It is four corners carrying the load that a whole pin field was designed to share.
The coat suffers too. A flat press mats the surface down rather than lifting it, so the brush polishes the outside of the coat and leaves the loose undercoat in place. The dog looks brushed and sheds the same amount the next day.
- Corner pressure: on a curved body the pad’s corners reach skin before its centre does
- Surface polish: pressing down compresses the coat instead of separating it
- Repeat passes: because nothing comes out, people brush the same spot again and again
- Heat and redness: that repetition on one patch is what the dog actually objects to
- A flinch that gets blamed on the brush: the tool is fine, the angle is not
What a Correct Slicker Brush Grip Actually Looks Like
Take the handle between your thumb and the first two fingers, about where the handle narrows. Your thumb lies along the top. Your remaining fingers rest underneath for balance rather than for grip.
Now tilt the head back about fifteen to twenty degrees, so the row of pins nearest you is clear of the coat and the far row is the part that touches. You should be able to see daylight under the near edge of the pad.
Move from the elbow and shoulder, not the wrist. The stroke is short, six to eight inches, and it finishes by lifting the brush away from the coat rather than flicking it out.
Your other hand is doing the real work. It lies flat on the skin just ahead of the brush, holding the skin steady and the coat loose. On a feathered coat this matters even more, which is why How to Brush a Border Collie’s Feathered Coat treats the holding hand as the main instrument.
Recommended Tools for a Comfortable Brushing Grip
Grip is mostly technique, but the brush you are holding sets the limits. A handle that is too thin forces a fist, and a pad the wrong size for the dog makes a good angle impossible to hold. The brush described below is the Flat Slicker Brush.

Flying Pawfect Flat Slicker Brush
The handle on the flat slicker is waisted rather than straight, which sounds cosmetic and is not. A waist gives your thumb and forefinger a natural place to settle, and once they settle there the pen grip happens on its own. A straight cylindrical handle gives the hand nowhere to sit, so it closes into a fist by default.
The large flat head measures 8.5 by 4 inches with the handle, which is roughly a palm across the pad. That size is what lets you hold a shallow angle and still cover ground, because a small pad held at an angle contacts the coat along a very short line and you end up pressing to compensate.
The whole brush weighs 121.6 g. Weight matters for grip because a heavy brush has to be supported, and supporting it tightens the hand; a light one can be steered with two fingers for twenty minutes without the wrist locking up.
The pins are fine bent stainless steel, densely set, standing 25 mm proud of the pad. Bent pins are what make a tilted stroke work: the bend means the tip travels along the coat rather than straight into it, so the leading edge opens a path instead of stabbing.
A flat head is the right choice for this article’s purpose because it rewards a correct angle and punishes a flat press, which makes it the brush that teaches you the stroke. On deep curly coats and rounded hips a curved head is more forgiving, and that is a genuine reason to own one rather than a reason to avoid the flat.
- Best for: double coats, short coats, silky coats and finishing
- Why it works: the waisted handle puts your hand into a pen grip without you thinking about it
- Pins: fine bent stainless steel, densely set, 25 mm on the large flat
- Weight: 121.6 g, light enough to steer with two fingers through a long session
- Warranty: one year warranty
The other thing that changes how a brush feels in the hand is the coat it is moving through. A clean conditioned coat offers less resistance, so you need less pressure to get the same result, and less pressure is the whole argument of this article.

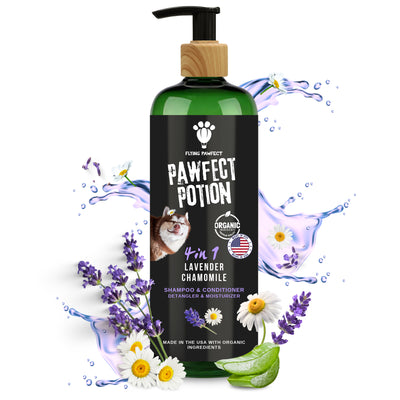
Flying Pawfect Pawfect Potion 4-in-1 Shampoo
Friction is the reason a brush needs force. A dusty, dry, slightly tangled coat grips the pins, so the hand tightens to push through, and once the hand has tightened the angle is gone.
This bottle cleans and conditions in one step, with plant-derived cleansers and organic ingredients, and it is free of dyes, SLS, parabens, phthalates and alcohol. It is pH balanced for dogs and it suits all animals.
It is not a shortcut. Comb and brush the coat out before the bath, dry it fully afterwards, and brush again. A bottle will not prevent mats on its own and it does not replace brushing or drying.
- Best for: lowering the brushing friction that makes people grip and press
- Why it works: cleaning and conditioning in one step
- Free from: dyes, SLS, parabens, phthalates and alcohol
- Context: brush out before the bath and dry fully after, or the wash works against you
One tool tells you whether your grip is actually working, and it is not the brush.

Flying Pawfect Long Tooth Comb
A brush held at the wrong angle leaves a coat that looks finished. The surface is smooth, the loose hair is gone from the top layer, and the base is untouched. You cannot see the difference and neither can the dog’s owner.
A comb can. Run it from skin to tip and it either travels or it stops. If your brushing was a flat press, the comb stops almost immediately, and that is the clearest feedback on grip available anywhere.
Use it at the end of each area rather than at the end of the session. Two strokes tell you whether to move on or go back, which saves you from brushing a finished patch again and from leaving an unfinished one.
The dual density teeth give the wide spacing for a first pass and the fine spacing for the test that decides.
- Best for: checking whether your brushing actually reached the base of the coat
- Why it works: it travels skin to tip or it stops, so a tidy surface cannot fool it
- Teeth: dual density steel, wide to pass and fine to test
- Context: test each area as you finish it, not at the end
Step by Step: Setting Your Hand on the Brush
Do this once with the dog beside you and it will feel strange for about a minute. Then it will feel obvious.
- Find the waist of the handle. Hold it there between thumb and first two fingers, the way you would hold a pen.
- Lay your thumb along the top. Not wrapped around. The thumb on top is what stops the hand closing into a fist.
- Tilt the head back. Fifteen to twenty degrees, until you can see daylight under the pin row nearest you.
- Put your free hand flat on the skin, just ahead of where the brush will travel, and keep the coat loose rather than taut.
- Stroke from the elbow. Six to eight inches, in the direction the coat grows, lifting the brush away at the end instead of flicking.
- Check with the comb before you move on, and only increase the angle if the comb is stopping.
Prevention Tips for Wrist Strain and Brush Burn
A grip that hurts you is usually also a grip that hurts the dog, so your own comfort is a reasonable guide.
- Swap hands at the halfway point, which forces you to re-set the grip rather than drift back into a fist
- Sit or kneel level with the area you are brushing, because reaching up or across tilts the head flat
- Count passes, not minutes. Three light passes over one patch, then move on, even if it is not perfect
- Put the brush down to feel the skin with your fingers if a dog reacts, instead of brushing the spot again
- Shorten the stroke before you add pressure. Short and light beats long and firm every time
- Stop while the dog is still settled, which is the only way a long session stays possible next week
Common Mistakes in How People Hold a Slicker Brush
Every one of these is normal, and every one is fixed by changing the hand rather than the tool.
- The hairbrush fist. Whole hand wrapped round the handle, head pressed flat
- Brushing against the coat. Going against the grain stands the pins up into the skin
- Holding the coat taut with the free hand, which turns every stroke into a pull
- Flicking at the end of a stroke, which snatches at whatever the pins are still holding
- Adding pressure when nothing comes out. Nothing is coming out because the angle is wrong
- Using a large pad on a small animal. The corners reach skin long before the centre does
That last one is the most common of all on cats, and the grip changes genuinely do differ between species. Cat Grooming vs Dog Grooming: What Is Different sets out why a cat needs a lighter hand and a smaller head.
FAQs
How should you hold a slicker brush?
Like a pen rather than a hammer, with your thumb along the top of the handle and the head tilted back fifteen to twenty degrees so only the leading edge of the pins meets the coat. Move from the elbow in short strokes and keep your free hand flat on the skin ahead of the brush. A pen grip physically limits how hard you can press, which is most of the benefit.
Why does my dog flinch when I brush, even gently?
Usually because the pad is being held flat against a curved body, so its corners dig into skin while the middle hovers over coat. It can also be the free hand holding the coat taut, which turns a gentle stroke into a pull. Tilt the head, let the coat go slack, and see whether the flinch stops before you blame the brush.
Am I pressing too hard with a slicker brush?
If you can see the pad flex, or the pin tips disappear into the coat all at once, or the skin is pink afterwards, yes. The right pressure is about the weight of the brush itself plus a little guidance. If nothing is coming out of the coat, the answer is to change the angle rather than push harder.
Should I brush with or against the direction the coat grows?
With it, in almost every case. Brushing against the grain stands the pins up and sends them into the skin rather than through the coat, and it compresses the base layer instead of lifting it. A groomer may back-brush a section deliberately for finishing, but it is not the stroke to learn first.
Does the size of the brush head change how I hold it?
Yes, and more than people expect. A large pad held at a shallow angle covers plenty of ground, but on a small dog or a cat its corners reach skin before the centre touches coat, so the angle you need becomes impossible to hold. Match the pad to the animal and the grip gets easier rather than more skilful.
How long should one brushing session last?
As long as your grip stays correct, which for most people is ten to twenty minutes. The moment your hand closes into a fist or your wrist starts doing the work, the session has stopped being useful and started being a risk. Two short sessions in a week beat one long one that ends badly.
Final Thoughts
Almost everything owners dislike about slicker brushes comes down to a grip nobody ever showed them. The tool is not the problem and a more expensive one will not fix it.
Hold it like a pen, tilt the head back until you can see daylight under the near pins, move from the elbow, and keep your free hand flat on the skin. Then let a comb tell you whether it worked. That is the whole method, and it costs nothing.