


A slicker brush that lasts has four things: fine stainless steel pins with a slight bend rather than a sharp point, a flexible cushion pad that gives under pressure, pins seated in the pad rather than glued on top, and a handle balanced so your wrist does the work instead of your fingers. Everything else is packaging.
Most people buy a slicker brush twice. The first one is chosen on price, the pins splay or the pad peels away from the head within a few months, and the second one is chosen on the specific thing that went wrong with the first. This guide is an attempt to skip that first purchase.
Slicker brushes look almost identical in a photograph, which is why the category is so easy to get wrong. The differences that matter are the ones you feel in the hand and see after six months of use, not the ones printed on the box.
Below is what to look at, what the marketing terms actually mean, and how to tell a brush that will still work next year from one that will not.
Why Slicker Brushes Fail
Brushes rarely break in a dramatic way. They degrade, and the owner stops using them without quite deciding to.
The most common failure is pin splay. Pins that are too soft or seated too shallowly gradually fan outward from the centre of the pad. A splayed brush stops reaching the skin, so it smooths the top of the coat and leaves everything underneath. The owner keeps brushing, the coat keeps matting, and the brush gets blamed for the wrong thing.
The second is pad separation. On cheaper brushes the cushion pad is glued to a plastic head. Moisture from damp coats works into the join, the glue lets go at one corner, and the pad lifts. Once that starts the brush is finished.
The third is corrosion. Pins made from plated steel rather than stainless will spot with rust, usually first at the tips where the plating is thinnest. Rust on a pin tip is rough, and rough pins drag on the coat and irritate skin.
The fourth is handle fatigue, which is a failure of the owner rather than the tool. A handle that forces a pinch grip will produce thumb and wrist soreness within weeks of daily use, and a routine that hurts stops happening.
What to Look For in a Slicker Brush
Pin material and finish
Stainless steel, not plated. Run a fingertip across the pin tips. They should feel smooth and rounded, with no burr or scratch. Sharp points are not a sign of effectiveness, they are a sign of poor finishing, and they are what causes brush burn on the skin.
Pin angle
The pins should sit at a slight angle, bent near the tip. That bend is what lets the pin slide between hairs and lift from underneath instead of scraping across the top. Perfectly straight pins push hair rather than separating it.
Pin density and length
Density should match the coat. Dense, shorter pins suit fine and short coats. Slightly longer, more spaced pins suit thick double coats where the brush has to reach through a guard layer. A brush with pins so densely packed that hair cannot pass between them clogs immediately on a shedding dog.
The cushion pad
Press the pad with your thumb. It should give and spring back. That flex is your safety margin, because it lets the pins retreat when they hit skin or a solid mat. A rigid pad transmits everything you do straight into the animal.
Head shape
Flat heads cover ground and suit body work on most coats. Curved heads follow the contour of legs, chests and faces. If you are buying one brush, a flat head is the more versatile choice for the body, with a smaller head for detail.
Handle
Hold it for thirty seconds. The weight should sit in your palm, not in your fingertips. Wood and coated handles stay grippier than bare plastic when your hands are damp, which they will be on bath day.
If you are still deciding between tool types altogether, slicker brush vs dematting comb covers where each one belongs and which is safer on a coat that is already knotted.
What the Marketing Terms Actually Mean
- Self-cleaning: A retract button that pushes hair off the pins. Convenient, but the mechanism adds moving parts and is the most common thing to jam. Useful on heavy shedders, unnecessary otherwise.
- Professional grade: Not a defined standard. It tells you nothing.
- Gentle pins: Usually means shorter pins, which on a thick coat means the brush cannot reach the skin. Gentle should come from the pad flex and the pin finish, not from pins too short to work.
- De-shedding: On a slicker this is fine. On a bladed tool it means the tool cuts hair, which thins the guard coat over time.
- Anti-static: Rarely meaningful in a brush. Static is a humidity problem, solved by conditioning the coat.
Recommended Slicker Brushes and Combs
Two tools cover almost every household: a slicker brush that opens the coat, and a stainless steel comb that tells you whether the brush actually did its job. The comb is the honest one, because a coat can look brushed and still fail a comb test.
A shampoo that conditions as it cleans is the third piece, because a coat with some moisture in it is a coat that brushes without breaking.
Flying Pawfect Slicker Brush
Flying Pawfect built this brush around the four failure points above, because those are the reasons people replace a slicker brush rather than keep it.
The pins are fine stainless steel with a slight bend near the tip, finished so there is no burr. They pass between guard hairs and lift loose undercoat out from below, which is the job a slicker is for. The finish is what makes it usable on a puppy or a cat as well as on a husky in April.
The cushion pad flexes under pressure and returns, so the pins give way when they meet skin or a tight mat instead of driving through. That flex is also what keeps the pins from splaying, because the pad absorbs the load rather than the pin bases.
The handle is shaped and weighted so the tool sits in the palm. Over a six-week spring shed, when you may be brushing twenty minutes a day, that is the difference between a routine you keep and one you abandon.
Use it in short controlled strokes, working in sections, parting the coat with your free hand so the pins reach the layer where mats actually start. Long sweeping strokes across the top of the coat feel productive and remove a fraction of the hair.
Clean the pins after every session. Hair left in the pad holds moisture against the pin bases, and moisture at the pin bases is what shortens the life of any slicker brush.
- Best for: Double coats, curly coats, long-haired cats, puppies and everyday at-home grooming.
- Why it works: Stainless pins with a proper bend, a pad that flexes, and a handle that does not fatigue the wrist.
- Context: Brush a section, comb-check it, move on. If the comb snags, brush that section again.

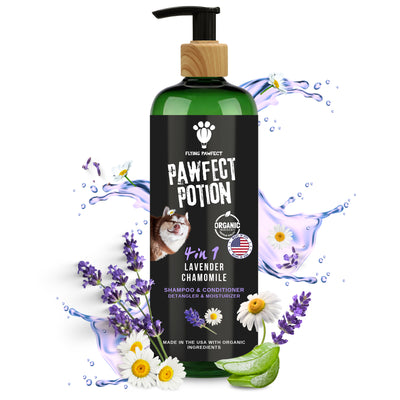
Pawfect Potion 4-in-1 Shampoo
How a coat brushes has as much to do with its condition as with the brush. A dry coat snaps and holds static, and both of those make a good slicker brush feel like a bad one.
This formula cleans, conditions, detangles and moisturises in one pass. It is pH balanced for dogs and uses plant-derived cleansers from coconut, with organic aloe vera and coconut oil, plus lavender and chamomile for a calmer bath.
The practical effect is friction. A conditioned coat lets the pins slide rather than drag, which means less pulling, a calmer animal and less wear on the brush itself.
Always brush and comb-check before the bath. Water tightens any tangle it finds, so a loose knot going in comes out as a solid mat.
Dry thoroughly and brush while drying. That is when the coat separates most easily and when your brush does its best work.
- Best for: Dry coats, static-prone coats, sensitive skin, and bath days before a heavy brushing session.
- Why it works: Four steps in one pass, and a conditioned coat reduces the friction that wears out both coat and brush.
- Context: Brush first, bath second, brush again while drying.
Step by Step: Testing a Brush Before You Commit
- Step 1. Run a fingertip across the pin tips. Smooth and rounded is right. Anything that catches on skin will catch on your animal.
- Step 2. Press the pad with your thumb. It should compress and spring back. No give means no safety margin.
- Step 3. Look at the pins from the side. They should sit in neat parallel rows with a consistent angle. Any that are already leaning will splay first.
- Step 4. Check where the pad meets the head. A moulded or well-seated join lasts. A visible glue line does not.
- Step 5. Hold the handle for half a minute. If your fingers are gripping rather than your palm supporting, it will hurt after a week of real use.
- Step 6. Try it on one section of coat, then comb that section. If the comb runs clean from skin to tip, the brush reached the skin. If it snags, the pins are too short or too soft for that coat.
If you want the full technique for pairing the two tools, how to use a slicker brush and comb together covers the working order.
Caring for a Slicker Brush So It Lasts
How long a well made brush actually lasts depends far more on cleaning and drying than on anything else you do with it, and How to Clean a Slicker Brush (Without Ruining the Pins) sets out that routine step by step.
- Clear the pins after every session. Lift the hair out with a comb rather than pulling it sideways, which bends pins.
- Never soak it. Wipe the pins with a damp cloth and dry them. Water sitting in the pad is what loosens pin bases.
- Store it pins-down or flat. Leaving heavy objects on the head deforms the pad.
- Do not use it as a dematting tool. Repeated forcing through a solid mat is the single fastest way to splay pins.
- Keep one brush per animal if skin issues are involved. Brushes carry yeast and bacteria between coats.
Common Mistakes When Buying a Brush
Buying on size. A large head is faster on a body and unusable on a face or leg. Match head size to the animal, not to the price per square inch.
Assuming sharper is better. Sharp pins are unfinished pins. They score skin and cause brush burn, which teaches an animal to dread grooming.
Choosing a rigid pad because it feels sturdy. Rigidity is not durability. The flex in the pad is a functional feature.
Buying a slicker to remove existing mats. A slicker prevents mats. Once a mat is solid against the skin, forcing a slicker through it hurts the animal and ruins the brush. That situation is covered in when you should stop brushing and call a groomer.
Replacing a clogged brush. A brush full of hair is not worn out. Clean it properly and it will keep working.
FAQs
How long should a good slicker brush last?
With daily use and proper cleaning, several years. If a brush is splaying within a few months, the pins were too soft or seated too shallowly for the amount of work you are asking of it.
Flat head or curved head?
Flat for body work and general use, curved for legs, chests and contoured areas. If you buy one, a flat head is more versatile, and a small head handles the detail work.
Are self-cleaning slicker brushes worth it?
On a heavy shedder, yes, because you will be clearing the pad constantly. On a curly or light-shedding coat the retract mechanism is one more thing that can jam.
Do the pins need to be sharp to work?
No. They need to be fine and smoothly finished with a slight bend. Sharpness causes brush burn and does not improve how much hair comes out.
Can one slicker brush work for both a dog and a cat?
Yes, if the pins are fine and the pad flexes. Cats need a lighter hand and shorter sessions rather than a different tool, though a separate brush per animal is sensible if either has skin trouble.
My brush leaves red marks on the skin. What is wrong?
Either too much pressure, or pins with an unfinished tip. Lighten the stroke first. If marks continue with a light hand, the brush is the problem.
Should I buy a bigger brush for a big dog?
A larger head covers the body faster, but you still need something small enough for the face, ears and feet. Coverage speed matters less than being able to reach every area.
Is an expensive brush actually better?
Not automatically. Price tracks pin quality, pad construction and handle design reasonably well at the low end and poorly at the high end. Test against the six checks above rather than the label.
Final Thoughts
A slicker brush is a tool you will hold in your hand several hundred times a year. The version that lasts is the one with stainless pins finished properly, a pad that gives, and a handle that does not make you dread the job.
Test it with your thumb and a fingertip before you buy, clean it after every session, and keep it away from solid mats. Do that and the second purchase never happens.
![[CL] Flying Pawfect coral large flat slicker brush for dogs](http://flyingpawfect.com/cdn/shop/files/CoralLarge2026.jpg?v=1783693245&width=400)
![[BL] Flying Pawfect baby blue large curved slicker brush for doodles and long haired dogs](http://flyingpawfect.com/cdn/shop/files/CBL_HERO_26_05_819be2a4-36dd-43dc-bda3-1730fa9e5818.jpg?v=1784475444&width=400)